![]()
![]()
MultiEd was designed to allow the user to customize it. Almost everything that MultiEd knows about a particular language is saved its MultiEd32.INI (initialization) file. The tools are also saved in this file along with other information that can be set in the Options menu. The spell checker's initialization is stored in the file Addict.cfg. Words that have been added to the spelling dictionary are stored default.udt. Normal users can customize the editor to meet their needs and desires just by specifying items in the Options menu. But there are situations where this may be impossible or undesirable. These include
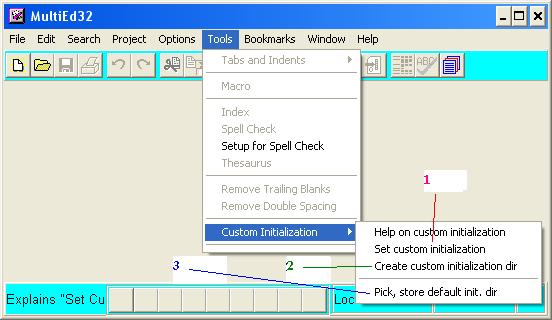
In other situations, the "Custom Initialize" item in the "Tools" menu may be helpful. Before using this menu item, all the files in the MultiEd window must be closed. Clicking this item brings up a submenu. The items in the submenu depend on the situation. Lets begin with the submenu shown on the right that shows up when MultiEd is initially installed on a normal machine.
Lets look at the numbered items one by one.
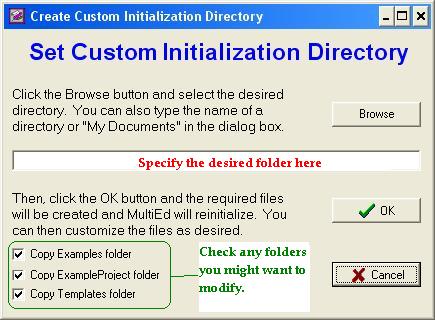 The folder must already
exist. MultiEd will also copy the example and template folders unless you
uncheck them. It then reinitializes itself just has if you picked item 1.
The folder must already
exist. MultiEd will also copy the example and template folders unless you
uncheck them. It then reinitializes itself just has if you picked item 1.
The specified folder must be writable. If you have access to a personal My Documents folder, you can specify that folder by typing just typing "My Documents" as the desired folder.
You can use an existing folder on a memory stick or removable, portable hard drive or you can put the initialization files on a network drive. Using portable or network drives may be useful if you work on lab machines and want to be able to use the same initialization files on each of them.
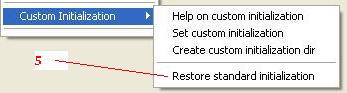
The next time MultiEd is opened, it will use the default initialization files. You can use item 1. to switch to your new initialization files.
Important notes: This item does not work when MultiEd was installed in a read only folder because it cannot modify the .ini file. It is not appropriate on portable drives that may not always be available.
In some situations you may find additional items in the Custom Initialization submenu. In some
situations you might see:

When this item is selected, MultiEd copies the initialization files together with the example and template folders and reinitializes itself using the new initialization files. In the future it will automatically use those file as evidenced by the tool and status bar colors.
When you are already using a custom initialization folder, the Custom Initialization
submenu may contain the following item
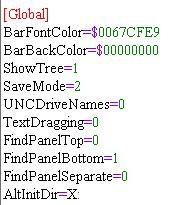 The image on the right show the "Global" section of a MultiEd32.INI file. Most of the
items are set using "Options >> Global Setup" dialog. We are currently interested in the
last item "AltInitDir". In the example, the custom initialization directory is set to the folder
"X:" When MultiEd opens, it will use the initialization files in that folder if they exist. If not,
MultiEd uses the default initialization files and "X:" will appear in submenu item 4:
above.
The image on the right show the "Global" section of a MultiEd32.INI file. Most of the
items are set using "Options >> Global Setup" dialog. We are currently interested in the
last item "AltInitDir". In the example, the custom initialization directory is set to the folder
"X:" When MultiEd opens, it will use the initialization files in that folder if they exist. If not,
MultiEd uses the default initialization files and "X:" will appear in submenu item 4:
above.
In a laboratory setting where the MultiEd folder is write locked, the system administrator should specify the personal folder available to users, if one is available, before the file is made read-only.
Return to the beginning of this file Return to the tutorial home page
Revised: 1/31/2011