
Tutorial:
Customizing Template Files
This tutorial will show you how
to customize a template file so it will be more useful and better meet
your needs. To illustrate the concept.we will assume that you want to customize the generic template for
web files - template.html.
The MultiEd\Templates subfolder contains templates (template-*.*), templates with menus
(templates-*.*) and macros (*.macro). Actually all of these are macros but the template files (template-*.*)
contain standard code for complete files. They are typically the easiest to customize.
Customizing "template-*.*" files
1. Open the desired template file in MultiEd:
By default, templates are stored in the MultiEd\Templates directory.
Click on the open button  .
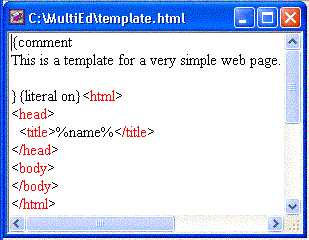
Navigate to the templates directory (normally C:\MultiEd\Templates) and select "template.html" It will
look
like what is shown on the right: .
Navigate to the templates directory (normally C:\MultiEd\Templates) and select "template.html" It will
look
like what is shown on the right: Note: In some cases it may be easier to edit the template in the
Macro Control. (If necessary, open any
file and then select Macro from the Tools menu.) You can then open the file in the Macro Control after
navigating to MultiEd's Template folder. The primary difference is that in a MultiEd window, the coloring
will be for the templates file type but in the Macro Control, the macro coloring will be used. |
 |
| 2. For the time being ignore the items inside of { }.
|
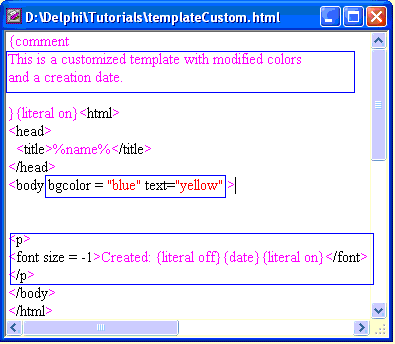
3. Customize the template: We will customize the template as follows:
- Change the colors of the document so they have a yellow font on a blue background.
- Add a created date at the end of the body.
- Change the comment to reflect the above changes.
The revised template is shown on the right.
|
|
4. Save the template: There are three options for saving the revised template:
- Replace the existing template. You can just use the save button
 .
.
- Save the customized file with a new name keeping the original. Use the "File | Save As ..."
menu item. The name should begin with "template" and have the same file type.
- If you are using a shared computer whose files are read-only: You will need to follow
the previous option but this time pick a directory where you have write priveleges.
5. You can use the new template just like any other template. If you used option "c" above, you will
need to browse to the appropriate directory and select the file.
Special macro instructions in template files.
MultiEd treats templates as macros and they contain macro instructions. MultiEd help contains
information about macros. We will just explain a few of the macro instructions commonly found
in templates.
But first we must explain that macros normally treat the pairs { }, < >, ( ), and [ ] and the ~
character
as meta characters with special meanings. MultiEd macros are basically keyboard macros. Except for
special macro
commands, text in templates and macros tell MultiEd what keys would need to be pressed. That
includes
{ } - These enclose special macro instructions (see below) or treat a character as a literal.
< > - These mean press and release the Control button.
( ) - These mean press and release the Shift button but they are normally not needed because
MultiEd processes capital letters automatically.
[ ] - These mean press and release the Alt button.
~ - Enter key - the same as {ENTER} or just pressing the Enter key in a macro.
Macro
instructions commonly used in templates
Macro commands and special keys enclosed by { } are
case insensitive.
- {Literal on}
- HTML file and Java programs often include characters that MultiEd normally
interprets as meta characters. {literal on} is commonly used to tell MultiEd to treat
all characters literally ignoring the special meaning of meta characters. Remember --
any other special macro instructions must be specified before giving this instruction.
- {Literal off}
- Stop treating meta characters literally and use them for macro instructions.
- {Literal...} Treat the text following "Literal" literally.
- {Comment text}
- The text is a comment for the sake of humans and is ignored by MultiEd. This means that you
can use extra spaces or "Enter"s inside of comments and they will be ignored. Elsewhere
MultiEd will type every space and "Enter" that appears.
- {Autoindent off}
- Turn off MultiEd's autoindent feature so that text is not automatically indented by
the same amount as the previous line in addition to any new indentation on the
current line. This allows the text in the macro to be indented in the desired fashion.
- {Autoindent on}
- Turn MultiEd's autoindent feature back on. Of course, literal must be off before it
is recognized.
- {BS}
- Press the backspace key.
- {Read filename}
- Start reading the specified file treating it as a macro. After finishing the file, return to the
current template.
- {Date}
- This is replaced by the current date but only when literal is off. Hence, it is common to
see the sequence.:
{literal off}{date}{literal on}
- %path%
- This is replaced by the complete path of the current file (even when literal is on).
- %name%
- This is always replaced by the name of the file being written.
- %ext%
- The extension of the current file. The complete path name of the current file can be represented
by
%path%%name%.%ext%.
- %multieddir%
- This is always replaced by the path to the directory containing the MultiEd files. (Notice the spelling
which treats "multied" and "dir" as one word. Lower case is required.)
Customizing files with menus (templates-*.java) and macros (*.macro)
While these files are similar to template files, these files are typically more complicted than the template files
discussed earlier. You are encouraged to study the tutorials covering macros before attempting to customize
these files. See MultiEd Tutorials for a listing of these files.
Return to the beginning of this file
Return to the tutorial home page
Revised: 10/4/2011