Tutorial
Creating and Using Projects
One of MultiEd's special features not found in common text editors is its ability to handle
"projects". Projects have the following advantages:
- They allow managing several related text files.
- The user can open files or make already open files active by clicking the name of a file
- In several programming languages, MultiEd can find classes and methods or functions. Clicking the
name of the item will take you to that item. This feature may be so useful that it may
make sense to create a project for a single long file.
- A project file optionally can be used as documentation.
- Programmable tool buttons can be set up to handle projects and special tools for Java, JavaFX,
Processing and Processing.js are provided.
.
MultiEd has a simple minded concept of a project. It is just a group of text files which are specified in
a .proj file. Typical projects might include all the Java files used for a particular program or a group of HTML
files for some web site. The Java project might include some data files or documentation files as well as
the .java files. A project for a Java applet might include the .html file used to display the applet.
The MultiEd distribution contains some projects in the ExampleProject folder. We will use files in that
folder in this tutorial.
Using an Existing project
 Open the
project: If there are any open files in your copy of MultiEd, it may be helpful to close them
first. Then click the project button
  . Select "Open" from the drop down menu. Browse to the
ExampleProject directory in the MultiEd directory (normally C:\MultiEd\ExampleProject). Pick
ShapeDemo2.proj. (ShapeDemo2 has some extra features not in the other project file. (Note: you
can also open projects using the normal open file techniques. The result is the same either way.) This
project consists of 4 .java files and 1 .txt file which contains documentation for the project.
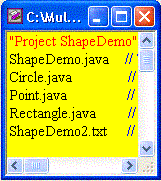
- Use the project file window: Observe that MultiEd displays the project in a special
window on the right side of MultiEd's window with a yellow background. The files in the project are
listed. This project also includes optional C and Java style comments: // denotes an
end-of-line comment and /* .. */ denotes the beginning and end of comments.
- Open and active files using the project file window: Double click one of the files
the project window. The file is opened. Double click to open a second file. Double click the first file
name to activate the already opened file.

 Open and active files
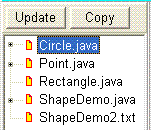
using the project tree window: Observe the project tree on the left side of MultiEd's
window. (If it is not displayed, select menu item "Project | Show tree" to display the tree.) In the left
hand project tree window, Circle.java, Point.java, and ShapeDemo.java are already open. Click on
some file names and observe that clicking on a file in the project tree results in the same action as
double clicking on the file in the yellow project file.
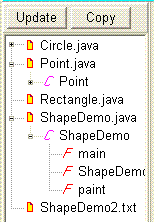
- Select a class or method: Notice the open .java files have a small "+" in the box left of
the file icon. Click on some of them. The tree expands. Lines marked with a "C" represent a class in
the file. Click on the little "+" left of a class name. The tree expands again to show methods in the
class. (F stands for "function", one of the traditional names for methods.) In the right hand project
window, ShapeDemo.java has one class (ShapeDemo). That class has three methods.Click on a class
or method name. MultiEd will activate the file (if needed) and then move to the line on which the name
is defined. For long files with many methods, this feature may justify creating a project for a single file.
Important note: The class and function items are not automatically
updated as you edit the file for efficiency reasons. So after modifying a file, you may need to click the
Update button to update the project tree.
- Compile and run the program: Activate one of the .java files other than the "main
program" ShapeDemo.java. Click the special "Compile and run" tool button
 (notice the "P" for "Project")
whose tool tip reads "Java project compile and run". MultiEd will automatically save any
project file that has been changed and submit the "main" program ShapeDemo.java to be compiled.
Java compiles any required file that has been modified. The resulting program is run in the
AppletViewer. The second special Java project "Run"
  tool with the tool tip "Java project run" only runs the
project without recompiling it. Notice that the original "Java compile and run" button will only save
and compile the active Java file.
Note: MultiEd takes advantage of "javac" in this situation. Javac normally will normally recompile
any required Java source file that has been saved since the last compile. Unfortunate, it sometimes
misses newly saved files. You may have to compile individual files if updates in them seem to be
ignored.
Creating a project
Again we will practice on the files in the ExampleProject folder.
- Open the files to be added to the project: In this case we assume that you have already have the ShapeDemo2.proj file open. If so, make sure all the
four .java files are open but close the ShapeDemo2.txt file if it is open. Then close the yellow project file window.
The project tree will close automatically.
- Create the project:
Click the project button
 . A dialog box opens
and asks for the name of the project. For Java, it is best to name the project with the name of
the "main" program. In this case the main program is ShapeDemo.java so type "ShapeDemo"
and click OK. MultiEd then asks for the directory in which to store the project file. It is normally best
to store the project file in the same directory as the files. So in this case select ExampleProject
folder in the MultiEd directory (normally C:\MultiEd\ExampleProject). MultiEd creates the project file,
displays it along with the project tree.
- Add a file to the project: Note that the project does not include ShapeDemo.txt yet. Open the
file. While the file is the active file, select the menu item "Project | Add current file to project". MultiEd
adds the file to the project file. Alternatively you can select "Project | Add all open files to project". Actually
MultiEd is smart about this. If an open file is already in the project, it is not added a second time. The project file
is not added to the project either.
- Optional: Add documentation to the project file The project file can be edited just like
any other file. You can add Java and C like comments using // and /* ...*/ .
- Save the project file: Select the project file window and click the save button
 .
.
Whole project Find and Replace operations
 If you click the find
 or replace
 buttons after
opening a project, you will observe an new check box called "Whole project".
When checked the Find/Replace box will change color to yellow to signify "Whole project" search.
MultiEd will automatically cycle through all the pages in the project to let you carry out operations on
all project files. After finishing the last file, the Whole project box is unchecked and the bar returns to the
original color.
Please contact
brinkje@plu.edu
if you have questions, comments, suggestions, or discover a bug.
Return to the beginning of this file
Return to the tutorial home page
Revised: 8/19/2011
If you click the find
or replace
buttons after
opening a project, you will observe an new check box called "Whole project".
When checked the Find/Replace box will change color to yellow to signify "Whole project" search.
MultiEd will automatically cycle through all the pages in the project to let you carry out operations on
all project files. After finishing the last file, the Whole project box is unchecked and the bar returns to the
original color.