 This tutorial is designed for both casual and power users. Casual users may wish to stop after Lesson 1,
2 or 3. Power users will want to complete Lessons 4 and 5. The appendix can be used after any of the
lessons
This tutorial is designed for both casual and power users. Casual users may wish to stop after Lesson 1,
2 or 3. Power users will want to complete Lessons 4 and 5. The appendix can be used after any of the
lessons
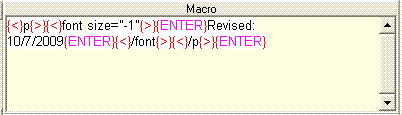
Lets suppose that you have several web pages and decide to add a revision date to the end of
them. We will be a little fancy and use a smaller font like was done at the bottom of this page. The
desired text will read as follows:
<p><font size="-1">
Revised: 10/7/2009
</font></p>
(The above text could easily adapted to a more modern versions of HTML and CSS if desired.)
Because we need to add this to several pages, a macro could be very helpful.
Note: The macro in lessons 2 - 5 are included in the TestPages subfolder with names of
the form DateLessonn.macro where n is the lesson number.
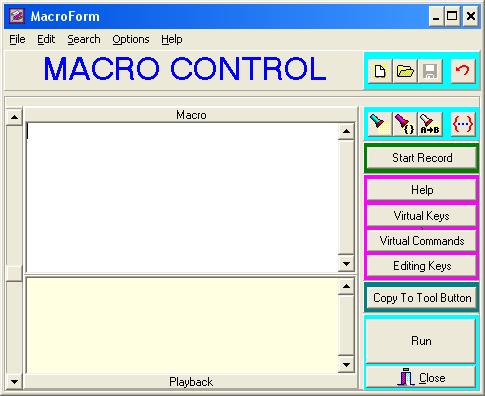
Lesson 1: A simple keyboard macro
To begin lets just write a simple keyboard macro.
 After making sure the
cursor is located correctly in file window, click the "Start Record" button in the Macro Control dialog box. The button
changes to "Stop Record". Type the blue text in the web page window:
After making sure the
cursor is located correctly in file window, click the "Start Record" button in the Macro Control dialog box. The button
changes to "Stop Record". Type the blue text in the web page window: Note: The macro window is in the word wrap mode. Consequently the macro's text will be wrapped onto multiple lines. Do not use the "Enter" key when editing the macro.
But what if you messed up and had to use the back space key to correct for typing errors? You would see the undesired keys and some "{BS}"s (the virtual key code for backspace). The macro will still work correctly even though it is inefficient. But you will probably want to delete the entire macro and start over or just edit out the undesired text.
There is a problem with the above keyboard macro. The date is always the same and the macro would need to be revised on different dates. There is an easy fix. Edit the macro to replace the specified date by the virtual command {Date}. MultiEd will automatically use the current date in the future. You will want to test the revised macro.
Note: The Macro Window is in the word wrap mode. The text will wrap as needed. Do not use the "Enter" key.
The macro is now reusable and you might want to store it in a tool button as explained in Appendix A. However, if you plan to continue on to the next lesson, you might want to wait until the next lesson is finished.
You can copy the macro and store it in a file, if desired.
What - you don't have a trusted assistant? Well, MultiEd can carry out your instructions if you just translate them into its macro language. The box shows the revised macro. The red text has to be added. Be sure to observe that you need to add a "}" at the end of the macro. (Remember that word wrapping may be different if the size of the Macro Control dialog is different. There are no "carriage returns" in the macro.) Lets explain the new commands one by one:
The macro in lesson 3a works fine but is difficult to read because of all the "{ENTER}", "{<}" and "{>} items. It is possible to write the macro in a somewhat more readable fashion. In lesson 3b, "{ENTER}" has been replaced by just pressing the "ENTER" key, The "{<}" and "{>}" items were eliminated by using {Literal on} and {Literal off}. Unfortunately "{Date} has to be surrounded by the literal off and on commands because it is a processed command - not text to be typed literally.
Once again you should test the macro. You may want to watch the initial steps very carefully to help understand how they work.
Unless you want to continue to the next lesson, you may want to install this macro in a tool button as explained in Appendix A. You will probably want to delete "{Sleep 300}" before saving it.
Hopefully lessons 1 to 3 were reasonably easy to understand. Lesson 4 is even more powerful but unfortunately somewhat harder to understand.
The macro in lesson 3 is great if we need to add the complete "Revised" paragraph to the web page. But what if we revise a document that already has the paragraph, all we need to do is replace the date. How can we tell which action is needed: We could look for "Revised: ". The instructions to our trusted assistant might look like the following:
You should test the macro. But before doing so it is best to check to make sure all the curly brackets are paired
correctly. The Macro Control's search menu "Find Brace F9" is helpful for this task. Place the cursor just before one
of the curly braces, select the menu item, press F9 or click the Macro Control's "Find brace" tool button
![]() and MultiEd will find the matching one. This button is part of the mini search menu bar
and MultiEd will find the matching one. This button is part of the mini search menu bar
![]() .
The button can also be used in the same manner to check for matching ( ), [ ], and < > pairs.
An even more powerful help is the Search menu's "Check { }" menu item and the associated button
.
The button can also be used in the same manner to check for matching ( ), [ ], and < > pairs.
An even more powerful help is the Search menu's "Check { }" menu item and the associated button
![]() .
This feature cycles thought the curly braces and stops with a warning box if it finds a unmatched
brace. (This feature is actually a macro stored in the file MultiEd\Templates\CheckCurly.macro and is
"programmable".)
The Sleep command can also be helpful in understanding how the macro works
and as an aid in debugging.
.
This feature cycles thought the curly braces and stops with a warning box if it finds a unmatched
brace. (This feature is actually a macro stored in the file MultiEd\Templates\CheckCurly.macro and is
"programmable".)
The Sleep command can also be helpful in understanding how the macro works
and as an aid in debugging.
See Appendix A if you want to add this macro to a tool button. You may want to wait if you plan to go on to the next step.
If you have several files to revise, you may want to MultiEd to help you load and save the files. The final lesson of the macro opens the open file dialog box, carries out the update and automatically saves the file. If you have additional edits you may carry them out and save the file again.
While the required changes are quite simple, the resulting macro has become quite complicated. Adding the comments has two advantages. It provides documentation and improves readability. It also allows us to have shorter lines! The new parts of the macro are:
Note: This macro opens the desired file for you. However before you can run the macro by clicking the "Run" button, you will have to have some file open. This is a safety feature. While this macro will open a file before it acts on it, most macros assume a file is already open and may cause serious unexpected problems if there is not an open file to process.
If you are sure that you don't want to do additional editing or review the changes, you could add <F4> to the end of the macro immediately after <s>. Control-F4 will automatically close the file.
After all the effort needed to develop this macro, you will probably want to save it in a tool button or as a file to make it really easy to use. See Appendix A for the details on how store the macro in a tool button. See Appendix B to see how save macro as a file. Of course, you will want to remove the "{Sleep 300}" virtual command first.
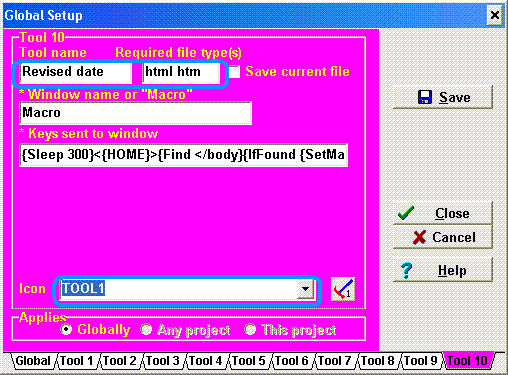 After the macro works correctly, you may
want to create a tool button for it and save it for future use. This requires that there is at least one unused tool button for
.html files. Click the "Copy to Tool Button" button. The Global Setup window shown on the right will appear. It might be
in a different tool tab than shown. We have made some changes in the first row. We replaced "Macro" in the "Tool name"
box by the more descriptive name "Revised date". We also added "html htm" to the "Required file type(s)" text box so that
the macro will be available in both ".html" and ".htm" files. (If you only use
".html" files, typing "html" would be sufficient.) You can select a different icon or type up to three characters
of text to be used on the tool button if none of the built in icons is appropriate.
After the macro works correctly, you may
want to create a tool button for it and save it for future use. This requires that there is at least one unused tool button for
.html files. Click the "Copy to Tool Button" button. The Global Setup window shown on the right will appear. It might be
in a different tool tab than shown. We have made some changes in the first row. We replaced "Macro" in the "Tool name"
box by the more descriptive name "Revised date". We also added "html htm" to the "Required file type(s)" text box so that
the macro will be available in both ".html" and ".htm" files. (If you only use
".html" files, typing "html" would be sufficient.) You can select a different icon or type up to three characters
of text to be used on the tool button if none of the built in icons is appropriate.
If you want to save the macro for future use, click the "Save" button. Otherwise the macro will not be available in future editing sessions. Then click the "Close" button. (If you want to return to this window in the future, you can select the menu item "Options | Tool Button Setup" and click the appropriate tab.)
An alternative: See the next appendix to see how to save the macro in a file and then use it.
The macro control's File menu has menu items for "Open", "Save", and "Save as". Normally macros are saved with the file type
".macro" in the MultiEd subfolder "Templates". (If that folder is "read-only", you can use a different folder.) After the macro has
been saved it is easy to use it. Just click the macro tool button
![]() and select the macro.
If stored elsewhere, you can navigate to the appropriate folder if the macro has been saved in a different folder.
and select the macro.
If stored elsewhere, you can navigate to the appropriate folder if the macro has been saved in a different folder.
Macro Control's open folder button ![]() can be used to reload the macro into the Macro Control.
can be used to reload the macro into the Macro Control.
Occasionally it may be appropriate to store the macro as a template using a name of the form
template-DescriptiveName.ext
Here .ext would be the file type of file to
which the macro applies. If the template is stored in the MultiEd\Templates subfolder then it will be listed when the
templates button ![]() is clicked.
Again if stored elsewhere, you can navigate to the appropriate folder.
is clicked.
Again if stored elsewhere, you can navigate to the appropriate folder.
Another alternative is to add the macro to an existing tool with a menu. Such a tool is often available with a
"Tools" button ![]() as part of a
submenu. This is more challenging but the tutorials
Writing macros with menus to provide options and
Writing macros with submenus explain how it is done.
as part of a
submenu. This is more challenging but the tutorials
Writing macros with menus to provide options and
Writing macros with submenus explain how it is done.
You are encouraged to contact me a brinkje@plu.edu with comments about these tutorials and suggestions for improving them.
Return to the beginning of this file Return to the tutorial home page
Revised: 10/5/2011