The tutorial looks at the writing macros with menus. Menus can be particularly helpful if you run out of unused tool buttons. It assumes that you are already familiar with macros. If not, it is suggested that you look at the first 3 lessons in the Introduction to macros tutorial.
Let's assume that you want to write some web pages that use a style sheet called "MyStyles.css". Moreover you know that it is going to include a "bordered" table with several rows having exactly 2 columns whose data is to be centered.There are several possible way to set up macros for this situation. The macro shown on the right is possibly one of the simpler ones but may not be the most useful. The option commands are shown in red, Other macro commands and keys are in black. The html code that can actually be written into the file is shown in green.
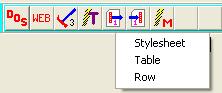
Before looking at the code, here is the popup menu it sets up. Normally the menu will appear underneath the
programmable tool buttons but if the MultiEd window is too narrow, it will appear in the upper right courner.
Now let's look at some of the code:
<link rel="stylesheet" type="text/css" href="MyStyles.css">The text had to be enclosed in {Literal on} and {Literal off} because it includes the meta characters "<" and ">" which would normally mean press and release the control key instead of being typed. The cursor should be at an appropriate place in the head section before this option is selected.
<table class="borderTable">

</table>
and moves the cursor up to the blank line. Again the cursor should be in the proper places before this option is used.
  <tr class = "center">
    <td>

    </td>
    <td>

    </td>
  </tr>
Finally, the cursor is moved upwards to the position needed to enter text for the first data item.
Question: How would we install this macro? There are at least four ways.
If you like to use different subfolders for different HTML projects, the "Keys set to window" could be modified to specify the folder holding MacroTools. In fact, if all the files are in subfolders of the same folder then the MacroTools file could be saved in the parent file and "Keys sent to window" value could be modified to read "{read %path%..\MacroTools.html}" because "%path%..\" repesents the parent folder of the current file's folder.
Note: When typing the {MenuOptionX ... } or {IfOptionX ... }" commands, the option character must immediately follow "MenuOption" or "IfOption" and then be followed by blank before giving the menu item text or the commands and keys that are to be processed when the option is selected. Any non-blank character can be used for the option X. Just be sure that MenuOption and IfOption use the same character.
In the following example, we will assume that the macro is stored in a tool button.
The suggested way of using this macro would normally be as follows:
After completing these steps the result would be.
<!DOCTYPE html PUBLIC "-//W3C//DTD XHTML 1.0 Strict//EN"
        "http://www.w3.org/TR/xhtml1/DTD/xhtml1-strict.dtd">
<html xmlns="http://www.w3.org/1999/xhtml" xml:lang="en" lang="en">

<head>
	<title>Example</title>
	<meta http-equiv="content-type"
		content="text/html;charset=utf-8" />
	<meta http-equiv="Content-Style-Type" content="text/css" />
	<link rel="stylesheet" type="text/css" href="Flowers2009.css">
</head>

<body>
<table class="borderTable">
  <tr class = "center">
    <td>

    </td>
    <td>

    </td>
  </tr>
</table>
</body>
</html>
That is a lot of code written with just a little clicking. One could add extra rows as needed and type the rest of the page.
To help writing these tutorials, a much more extensive macro, Tutorial macro, was develovoped. (The easiest way to use this macro would be to RIGHT click and download the file and then open the Macro Control and open the file in that control. It could then be saved in a tool button.) It is found in the Tutorial subfolder. It has 15 menu items that were designed to supply HTML tags and code used in when writing these macros. With minor changes it could be adopted for other uses.
The next tutorial Submenus shows how to write macros with submenus.
Return to the beginning of this file Return to the tutorial home page
Revised: 10/5/2011