This tutorial will show you how to use some of MultiEd's special features to simplify creating a Java program.
It assumes that the Java SDK has been installed on your computer, that the system has been set up to know where the Java programs are stored. (See Setting up Java, if needed.) It also assumes the tool buttons "Java compile and run", "Java run", and "Tools" were included when the programmable tools buttons were set up. (See MultiEd's Tool Setup Program, if needed.) They are included in the default setup of MultiEd.
| Selecting the template (The list of available templates will vary.) | 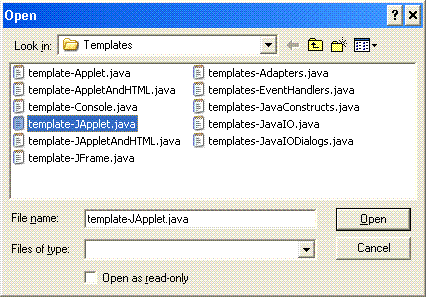 |
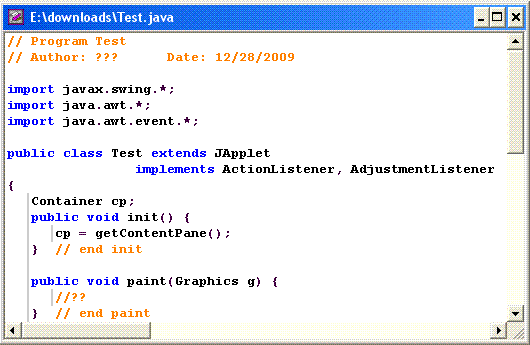
| The first part of the resulting file is shown on the right. You should begin by replacing "???" in the second line by your name.
Comment: The template files are intended to be customized to meet your needs. See the tutorial on customizing templates. |
 |
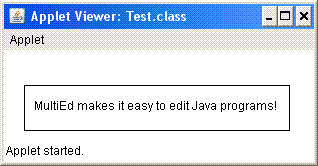
MultiEd will compile your program. After the file compiles correctly, it will try to run it. It detects "extends JApplet" in the file and checks to see if can find a corresponding .html or .htm file (We will use Test.html or Test.htm in our example.) If it can't, it creates a very simple default file (TestDefault.html in our example). It then loads the applet into the Applet Viewer. In this case the applet is blank because we haven't added anything to the basic structure provided by the template.

 Click the Java compile and run tool button
Actually, MultiEd did a little more than what is apparent. The macro knows that dialogs require an "import javax.swing.*;" statement so it checked to see if it could find it. Fortunately it already exists in this program. If it hadn't already been there, it would issue a warning and then add the import to the very beginning of the program.
The Tools button's menu provides access to menus that will write some Java statements, event listener classes and adapters, and some Java console and file I/O statements as well as I/O dialogs.
Hint: You may want to resize your applet or create a web page for it. You can do so by
creating a WEB page Test.html. You can use an a template
(template-ForApplet.html) to create a simple web page and customize it. You can run the page in the
Applet Viewer by using the "Java run" button while viewing the Java program or in a browser using a
web button ![]() while
viewing the .html file.
while
viewing the .html file.
Hint: If you prefer to use non-Swing applets, you can use the "template-Applet.java" template. Templates for frames and console programs are also available.
Hint: Java programs require many match pairs of curly brackets { }. The indent lines provide one way to
keep track of them. Another uses the "Find brace" tool. Put the cursor on a curly bracket, click the
"Find brace" tool button
![]() and
MultiEd will move the cursor to the matching bracket. The button also works with the pairs ( ),
< >, and [ ].
and
MultiEd will move the cursor to the matching bracket. The button also works with the pairs ( ),
< >, and [ ].
Hint: If your Java program is long or consists of several files, you may want to create a project. The MultiEd directory contains a subdirectory called "ExampleProject" that illustrates projects. See the MultiEd's Help item "What is a project?" or the Creating and Using Projects Tutorial to learn how to create a project. It is pretty simple.
Hint: By default, MultiEd also provides buttons that will open Java documentationThe following sections explain how to setup Java. They can be skipped if this has already been done.
BE SURE TO READ: the "Installation instructions" provided in a separate link to a ReadMe file. This may require several clicks. At the time this tutorial was written, they were available in the Documentation section of the download page but this is subject to change. Those instructions tell you how to set the "PATH" ENVIRONMENTAL VARIABLE which makes it easy to compile and run Java programs. Make sure you follow the instructions for your version of Windows.
When setting the PATH variable, you should check for an CLASSPATH variable as well. If it already exists, add ".;" to the beginning of it. If not, it may be best to create your own setting CLASSPATH to "." (a period). While this is the default, some programs will set their own CLASSPATH when they are installed and it probably will not include the ".;" term unless it is already there. Note: "." represents the current folder, what ever it may be.
The download page also allows you to download Java Documentation. (The link was in the documentation section of the download page when this tutorial was written.) You may find it convenient to download it even though it is available on line. It will be easiest if it saved in the folder C:\Program Files\Java\ but this location can be changed as needed. Doing so should enable the "Java API help documents" programmable button although it may be necessary to modify the "Program name" field for the programmable tool to correctly reflect the location of those help files.
The "Create Java Doc" programmable tool button
![]() will create documentation for the current Java file. If
you prefer, you can change the Parameters field of the tool's tab in the Tool Buttons Setup dialog from
"%name%.java" to "*.java" if you prefer create documentation for all the Java files in the folder. When
you have a project open, a second "Create Java Doc" button with a "P" in it appears.
It already has this modification.
will create documentation for the current Java file. If
you prefer, you can change the Parameters field of the tool's tab in the Tool Buttons Setup dialog from
"%name%.java" to "*.java" if you prefer create documentation for all the Java files in the folder. When
you have a project open, a second "Create Java Doc" button with a "P" in it appears.
It already has this modification.
Return to beginning of the Tutorial
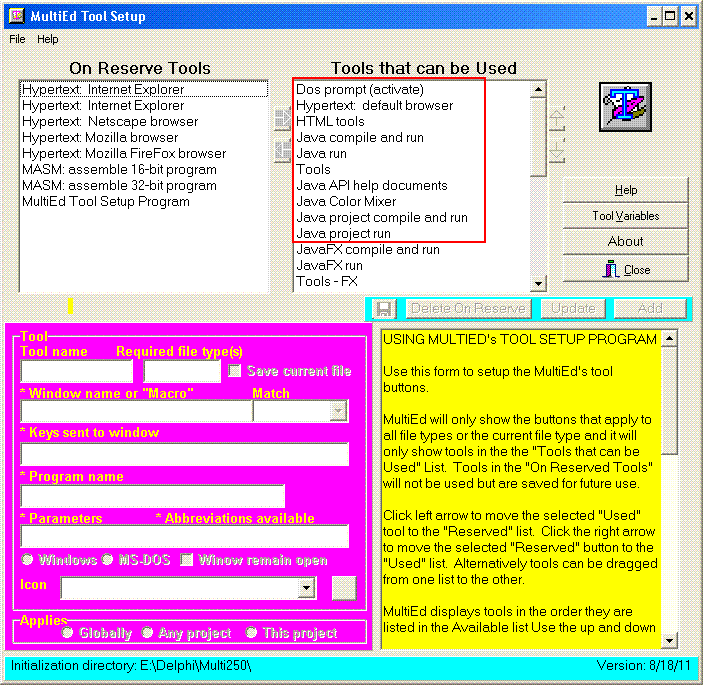
The MultiEd download includes several programmable tool buttons that are useful when working with Java.
Note: In Windows 7, when you open the Tool Setup program, you may get a warning dialog asking "Do you want to allow the following program from an unknown publisher to make changes to this computer?". If so, you will need to click "Yes". The Tool Setup does not make any changes on your computer unless you "Save" changes. Why Windows 7 is concerned about this program is unknown.
 You can run
the ToolSetup.exe program to select the tool buttons you wish to use. Close MultiEd if it is open before running
this program which is in the MultiEd folder. Several tools are useful when using Java. The tools can be listed
in a different order, if desired. The tools shown in the two lists will be different than those shown. Some of
the tools start other programs. In order for this to work, the tool must be on the path or its location known.
The comments include the .bat file or tool parameter that may need to be edited.
You can run
the ToolSetup.exe program to select the tool buttons you wish to use. Close MultiEd if it is open before running
this program which is in the MultiEd folder. Several tools are useful when using Java. The tools can be listed
in a different order, if desired. The tools shown in the two lists will be different than those shown. Some of
the tools start other programs. In order for this to work, the tool must be on the path or its location known.
The comments include the .bat file or tool parameter that may need to be edited.
Some of the tool buttons that are available include the following:
The top center section of the MultiEd Tool Setup dialog box shows the tools that currently can be used by MultiEd. You may want to use a tool in the "On Reserve Tools" list in the upper left section. To do so, use the right arrow button or just drag tools from the left list to the "...can be Used" list. To remove a tool button from the "... can be Used" list, click the left arrow or drag it to the "On Reserve List". You can also change the order of the files in the "... can be Used" list by selecting a file and using the blue up and down arrow keys or just dragging a file. When you are finished click the close button and say "Yes" when you are asked if you want to save the new setup.
If you need to edit a tool, select it, edit as desired, and click the "Update" button. Remember to "Save".
Return to the beginning of this file Return to the tutorial home page
Revised: 10/4/2011